Old Posts

Saturday, March 5, 2011

Weathering cars

One of the subjects of model railroading that I have not even touched on yet is what is called weathering, and for good reason too!  Weathering is one of those subjects that is so broad that it is daunting to even attempt to explain and demonstrate.  However, help came in the form of Model Railroader Magazine with Cody Grivno's, "5 Ways to Weather", article that demonstrates the 5 easiest and best weathering techniques.  they are numbered as follows:
Airbrush
Artist oils
Powdered pastels
Dry-brushing
Cosmetic applications

After reading the article, I decided to try weathering with artist oils, and i couldn't be more happy with the results!  The April 2011 issue of MRR is a must for this subject and I recommend getting this one!

Weathering is basically making a plastic model look worn like it was out in the elements.
with trains, dirt, grime, mud, rust, UV paint fading, dust, scratches, dents, and rotting wood are the main elements that are modeled when weathering.  there are several things that must be made known when weathering:

  • train cars are different even if they are in the exact same environment as the one coupled to it.
  • rust and grime are not symmetrical on the car
  • the roof is more faded than the sides
  • most gondolas have dents
  • dust from A. over-filling cars with grain or gravel, or B. a part of the car goes through the exact same situation as the other side, will make marks that are similar and even symmetrical.
Knowing these things, I set out to weather my first car!

The first thing to do is take the sharpness of the white off.  For this, I  used burnt umber oil paint to model grime and dirt.

To start, I added a mark to several spots on the car, but no more than 3 or 4.

Then, I smeared the marks with a cotton swab.

I also varied the width and length of the streaks to look more natural.

Next was flat black to represent a darker, more pronounced dirt.

I found that black looks best towards the roof of the car, so I made several marks on the roof line.

Using the cotton swab, the black streaks added more depth.

To simulate rust, I heard that red or brown would do, but I decided on using both to get a more dinamic color.

Rust appears on rivits more than in the center of metal panels, so I lightly added the red/brown mix in those areas.

Finally, white came into consideration for fading and even bird droppings.

The white was smeared on horizontally to add more dynamic depth.

With everything on, I was close to finish but a few more steps remained

I added some more black.

And I finally rubbed off some paint to complete the weathering.

The top of the roof before weathering, the bottom after.

before photo.
Canadian Pacific steel boxcar, I used the white to add fading and wash out to the white lettering and very little rust to indicate a relatively well maintained car.

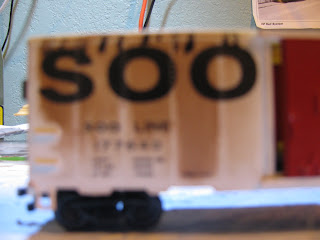
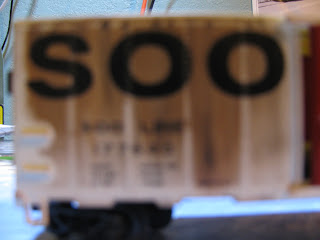
Here is a SOO Line reefer from the steam era.  Because there was too much orange, i just black washed the car and faded the roof.

Con-Rail Hopper that has been in service a while.  I used white to simulate the UV effects on metal paint.

And finally, a Conoco Oil tank car that has some black over spill along the dome and the cylinder from years of use.

Re-building Rock Springs Gravel Co.

Shortly after completing the front half of the layout I came to realize that the Gravel pit in the back half was too hard to efficiently switch.  the Track plan consisted of a Time saver- like track-plan with the switch back being the main line.  Though it was fun to operate and switch, it was complicated and slowed down operating sessions.  I wanted an efficient track plan that was still complicated.  So I decided that the Gravel pit would need to be re-done and get a face lift.

The first step that I do when building, or re-building is planning out everything.  to do this I didn't want to create a track plan on paper because the dimensions were really weird and could not be reproduced in scale on paper. So I had to rip up track and create a plan in a 1:1 scale.
But how does one rip up track so that the track can be re-used.  My track was harder than most because the track was glued to the base with liquid nails and is hard as a rock when dry.  However I still succeeded with only carrying a little of the scenery away.  This is shown in the following photos:


Using a foam knife, I gently pried up the track piece by piece.

Here is what the layout looked like in mid demolition. 
The following photos are the test fitting.  Notice that few pieces are connected yet.


Looking down towards the gravel loader.  Notice that i am leaving the track in a bumpy state, this helps to keep speeds slow and makes the overall track look like it receives low maintenance.  Also notice that the pink foam hills will be gravel piles. 

I used the track from the old layout at the end to give the trains more space and to disguise an already well hidden end with feeders. 

The first green has already appeared on the layout, although not glued down.
The back drop has been started!  I used artist oil paints to create and "art-like" feel to the layout.

Here are all of the hills and one of the loading ramps that front-end loaders crawl up to dump their load into a hopper.

This is the second loading ramp.

For gluing foam down, here are the materials needed, Elmer's foam safe wood glue, and a stir stick to fish out the glue from the bottle.

Before beginning, make sure EVERYTHING is off the layout.

My glue had sat in a closet for a while, so I shook the glue bottle so any particles go back into solution.

My stir stick wasn't wide enough so I got a spatula to get the glue.

After the glue is on the foam, rub it around the base like cake frosting.

Here are my first two hills being covered in gravel, a lot of glue is necessary to keep this much held down.

I use a technique for gluing gravel on hill sides where after glue has been applied, I take a spatula and mix the soaked gravel with the dry gravel so glue is absorbed better.

For applying glue, I use a contact solution bottle with a 3:1 mix of water and glue.  This gives me control over where the glue ends up.

When applying glue in this fashion, I hold the bottle up-side-down and on the top of the hill.


label search.

Now that I have enough posts up on this site, here are some things to search for in the upper right search box:
Construction:
building a model railroad
re-building a model railroad

Planning:
garden railroading
how do I start in trains
trackplanning


Operation:
trackplanning

Control:
building a model railroad

More things are sure to come!


Getting started in toy trains

The hobby of model railroading has been around since the early 20th century and has drawn millions of people into it.  Model railroading is even recognized as "the World's greatest Hobby", which says a lot about how people react to a miniature train acting exactly like the prototype.  But how does one get started in this hobby?

  • There are several ways to get started and the most common for people is they go and buy a train set.  A train set includes a locomotive, track (usually a circle or oval), transformer(to run power to the track), rail cars (usually freight with a caboose), and a few accessories.  But when buying a train set, it is advisable to stay away from the cheap sets.  these sets have plastic wheels (which keeps the rails dirty), brass or steel track, and single motor unit engines.  The best train sets are those that are made by big names in the hobby that are known for their quality. a few that I am aware of are: atlas (the best manufacturer in my opinion), Athern, Bachmann (another of my favorites), Walther's, and Kato.  some brands that buyers should be aware are: Life-like, some old Bachmann sets.  though they are workable on a dedicated train layout, the cheap sets are usually running unreliably, molded plastic in unrealistic pain schemes, and feels like a toy. A good train set should look, run, and feel realistic.


  • Another way to start is to buy all of the items separately, getting a locomotive, several cars, buildings and all the track you want has some advantages.  One thing that this method has over manufactured sets is that you get the road name you want for everything that rolls.  Also you get switches if you want, another thing that a set lacks.  Plus you could even get hooked up with DCC which is a lot better than average DC.

  • The third method of getting started in the hobby is to build what is known as a micro layout.  They can be interesting and are as fun as a full layout.  I saw someone at a train show operating one of these micro layouts and he was as busy as a real railroad operator.  The best thing about micro layouts is that they are usually cheap, because they are small. To find out more you should click here.  It is free to see and it has all the information you could find on the subject.

  • The fourth method to getting started into this hobby is to just build a train layout.  Subscribing to a magazine such as Model Railroader would  be of great help to a beginner.  A magazine such as this every year builds a project train layout and showcases it over several issues.  The staff at this particular magazine also explains what they did to complete their project in detail.  Building a train layout right of the bat is not advisable by most modelers, but personally, that is exactly what I did and by my third layout, I had built it perfectly!  that's not to say that the prior two didn't operate, they just had quirks that I finally got rid of.  but don't let the idea of three train layouts scare you, everything takes practice and to avoid making costly mistakes, avoid la large layout to start.  2X4' for N, 4X6 for HO, 4X8 for O scale, and 5X10 for G scale are what I would use for dimensions of a starter layout.
So jump on in to the hobby!  You'll never know what you like until you try.  And if you don't like being a model railroader, then atleast you won't have made costly mistakes by following advise from this blog, and others that represent this great hobby!

More to Come!!!

This site is still young and needs to mature before it becomes a reliable source for the World's Greatest Hobby.
But more is sure to come soon that will help this blog reach its potential!  I already am planning on expansion of several posts, as well as revisiting some areas that need more explanation.  I am re-building half of my railroad, and the Re-building post will be revised in the near future as I near completion of my railroad.
I also am doing research on a topic that is new to me, and this site, rail-fanning!  So a page will be dedicated to real railroads in the area that I live.  So stay tuned for real trains as well as new posts and modeling areas that are yet to be covered!